Certain products have an option to add a die cutting guide to achieve a cut shape, perforation, score/crease or punched hole. This guide is supplied to us using a special spot colour swatch. This swatch is available in our templates, please ask for a copy before starting your design.
How to supply your cutter guide
Download the appropriate InDesign Die-Cut Template to start your design from.
All of our InDesign templates include specific colour swatches for all finishing options or you use the instructions below to set up the 'DIE-CUT FORME' spot colour yourself:
- Create a New Colour Swatch in Adobe InDesign/Illustrator.
- Name the swatch 'DIE-CUT FORME'
- Set Colour Type to Spot
- Set Colour Mode to CMYK
- Colour Make-up is 37% Cyan and 83% Yellow
- Set stroke to Overprint ()
.png)
How to add a die cutting guide to your artwork
-
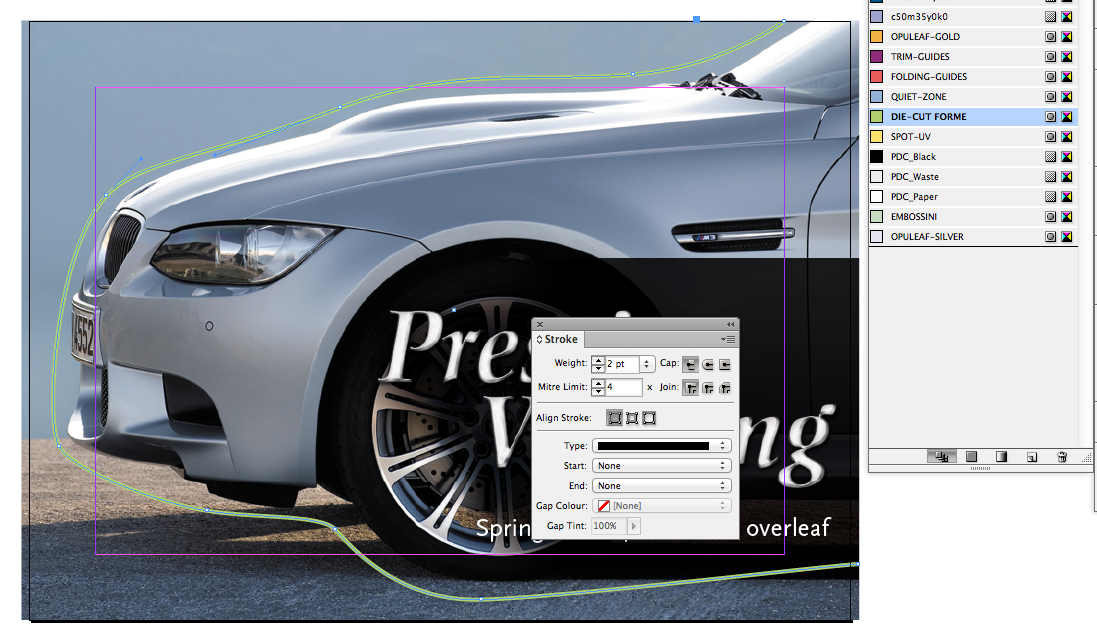
Place your Die Cut lines above your artwork using the special DIE-CUT FORME spot colour swatch. This swatch must remain as a spot colour and must not be adjusted in any way. The lines must be a 2pt stroke width.
-
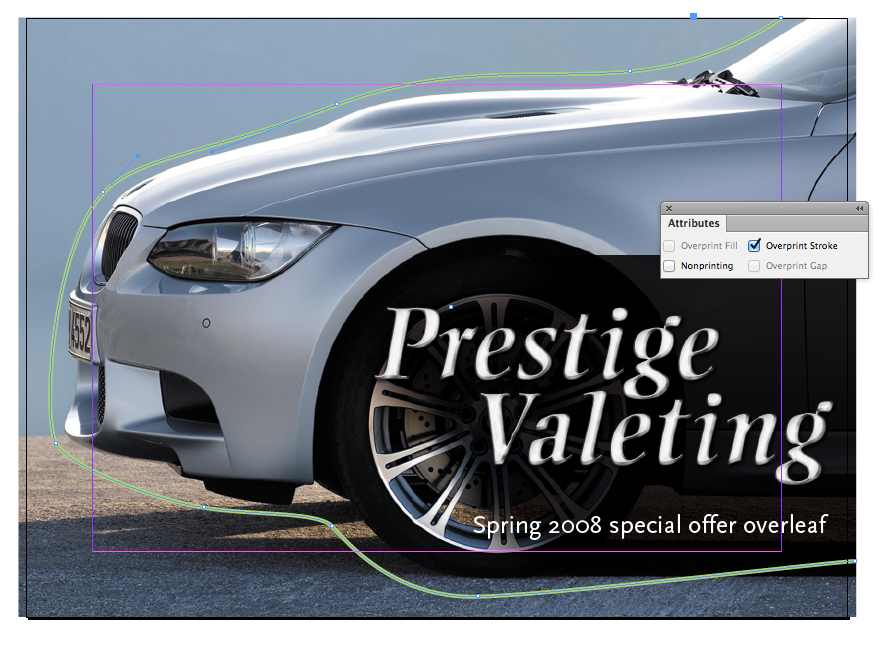
Set the DIE-CUT FORME elements to Overprint from within your design application.
-
Die cutting is suitable for simple shapes only.
-
Only place Die Cut lines on the front page of your artwork.
You can specify a cut shape, perforation, score/crease or punched hole. You indicate these using different stroke/line types. The different cut/perforation types are denoted by line style:
| Feature name |
Finished appearance |
Graphic file specification |
| Cut |

Continuous cut |

Solid line |
| Perforation 3/3 |

3 pt gap, 3 pt cut, … |

12pt dash, 2pt gap,
2pt dash, 2pt gap, … |
| Perforation 2/10 |

2 pt gap, 10 pt cut, …
|

2pt dash, 2pt gap,
2pt dash, 6pt gap, …
|
| Perforation 2/35 |

2 pt gap, 35 pt cut, …
|

12pt dash, 4pt gap,
2pt dash, 4pt gap,
2pt dash, 4pt gap, … |
| Perforation 2/70 |

2 pt gap, 70 pt cut, …
|

4pt dash, 4pt gap, …
|
| Crease |
Continuous crease |

2pt dash, 2pt gap, ... |
| Punched hole |
Available as: 2½ mm, and 3 mm – 10 mm in increments of 1 mm. |
Fill Colour: DIE-CUT FORME, overprinted.
Diameter: 2½ mm – 10 mm. |
Perforation 3/3 is the strongest perforation recommended for Tear-off panels.
Perforation 2/70 is the weakest perforation recommended for Push-Out Shapes on Laminated 400gsm products.
Please contact us to discuss the suitability of perforation you require for your chosen paper stock.
Setting your die-cut line styles
A Die-Cut Crease line style created in InDesign using a 2pt dash and a 2pt gap alongside Stroke Weight and Colour Swatch settings.

Limitations: Getting the most from Die Cut products
Die-cut Suitability for Perforations
To ensure the perforation you require is suitable for the product chosen please get in touch before placing your order.
Movement
You can expect the die-cut guide to move by 1mm in either direction.
Forme complexity limits
If your job is going to be die-cut, then it is acceptable to use any combination of cuts, perforations, creases and punched holes, providing that the total number of anchor points does not exceed the maximum allowed for a simple shape, dependent on the flat size of the product.
| Flat size |
Anchor point limit |
| Simple |
Complex |
| Smaller than A4 |
15 |
23* |
| A4 or larger |
20 |
28* |
*Complex shapes/formes may be subject to additional costs. Ask us for details before placing your order.
One straight side ('Push-out' options)
As standard, your job will be supplied with the cut-out shape held within the card skeleton.
If you wish us to remove the waste from the edge of a shape, then please contact us to add a "push-out" option to the job specification.
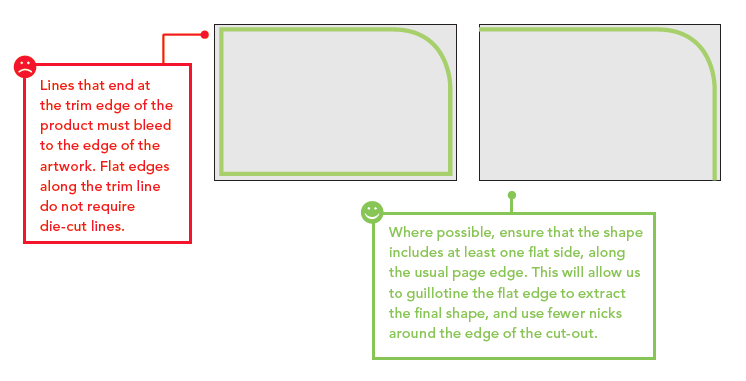
Where possible, ensure that the shape includes at least one flat side, along the usual page edge. This will allow us to guillotine the flat edge to extract the final shape, and use fewer nicks around the edge of the cut-out, thus improving the final appearance of the product. The turnaround will increase by 1 day per 5,000 above quantities of 10,000.
No straight edges ('Push-out' options)
Please contact us if your shape doesn't have any straight (guillotined) edges so that we can understand what you're trying to achieve. It is more difficult to push out this type of shape, so if you require your print to be pushed out, this will add a small cost to your job. The cost is £5 per 1,000. The turnaround will increase by 1 day per 1,000 above quantities of 5,000.
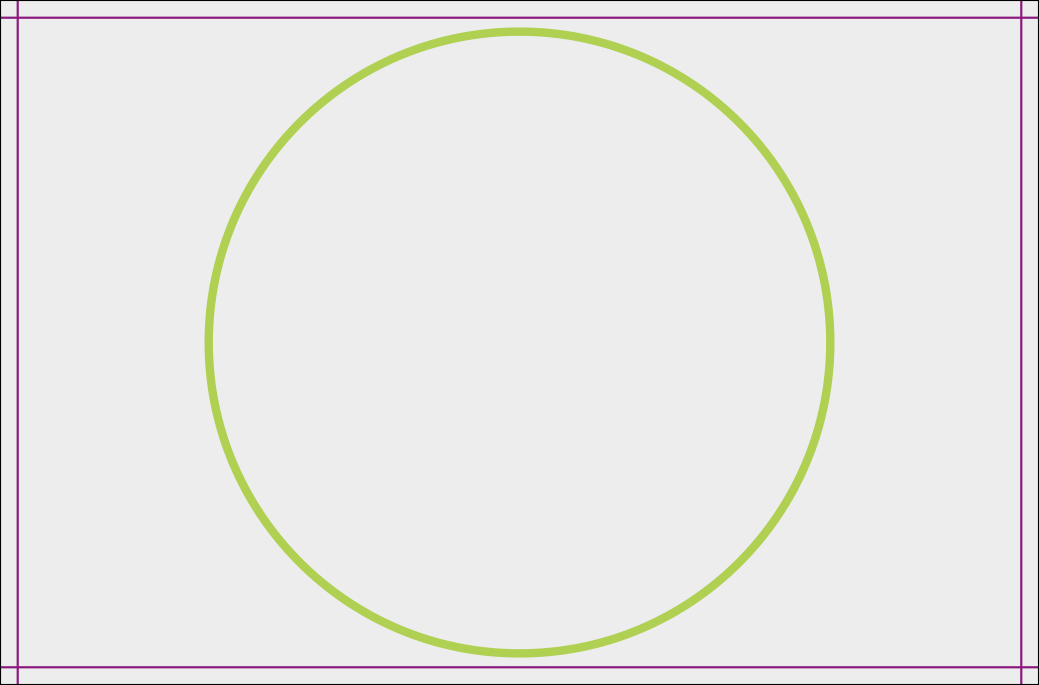
Example: Die-cut Circle with No Straight Edges. This job would require 'pushing out' as the Guillotine cuts do not assist in releasing the shape from its skeleton.
Example: Die-cut Rounded corners with No Straight Edges. This job would require 'pushing out' as the Guillotine cuts do not assist in releasing the shape from its skeleton.
-1.jpg)
Please choose a Round Corner Business Card if you require this shape.
Nicks to hold your cut-outs
To prevent a cut-out shape from ‘falling out' of the sheet, we will place small nicks in the cut lines. These nicks are made with a grinding wheel.
The more straight edges that we can cut at the guillotine later, the fewer nicks are required to hold the product in the sheet.
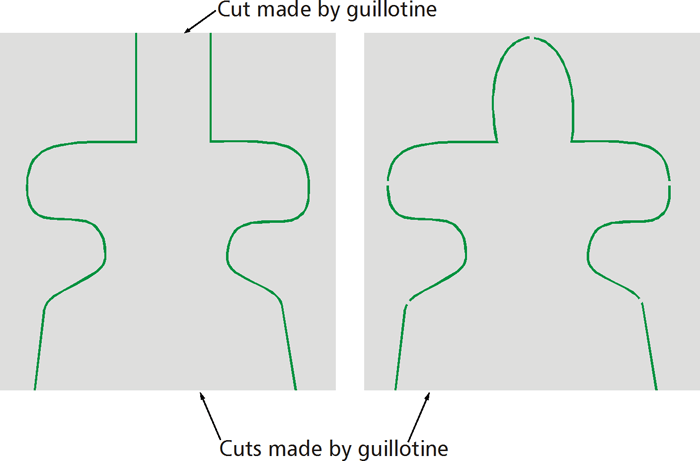
Left: Two straight edges = no nicks; Right: One straight edge = many nicks.
We will always use the minimum number of nicks required to keep the required shape intact until it is packed. If you wish the push-out shape remains intact during use, you should select one of the perforating options instead of a cut.
Minimum corner radius
The minimum corner radius on a die cut is 3mm.
Acute Die Cut Shape and Angles
If you are designing a die-cut product that requires an acute angle, you must be aware that there is a minimum angle radius where the two lines meet into a point of 5 degrees.
Vectors only for Die Cut lines
Die Cut elements must be supplied in vector format.
Smallest size
You need to be able to place either one 45mm diameter circle, or two
non-overlapping 30mm diameter circles within your shape. This includes small shapes for pushing out.
The smallest circle that can be produced is 30mm in diameter, any other shapes must adhere to the above sizes.
Cracking
When paper is folded, its interlinking fibres are compressed on one side and stretched on the other. If the outer fibres lose their hold on each other, we see this as 'cracking': an opening out of the paper on the outside. This will be more visually apparent when the design includes a dark colour across the crease. If dark colours are required please upgrade to a Laminated Product which will help to reduce the appearance of cracking.
Proximity of die-cut lines
- Unless it is vital to your design, make sure that die-cut lines do not encroach within 3 mm of the edge of the page. It could impact on the finishing of your order if lines are placed within 3mm of the page edge.
- Lines that end at the trim edge of the product must bleed to the edge of the artwork.
- Creases should have a minimum spacing of 6 mm.
- Keep creases and cuts at least 2 mm away from SPOT-UV elements to avoid cracking of the Spot UV.

Samples
We have produced some printed samples that demonstrate how to use Die Cuts, ask us for your free copies.

 Print this page