Plastic Card Templates
Download the appropriate InDesign Template to start your design from.
Artwork Specification
| |
Finished size |
Document size |
Bleed |
| Regular |
86 × 54 mm |
92 × 60 mm |
3mm |
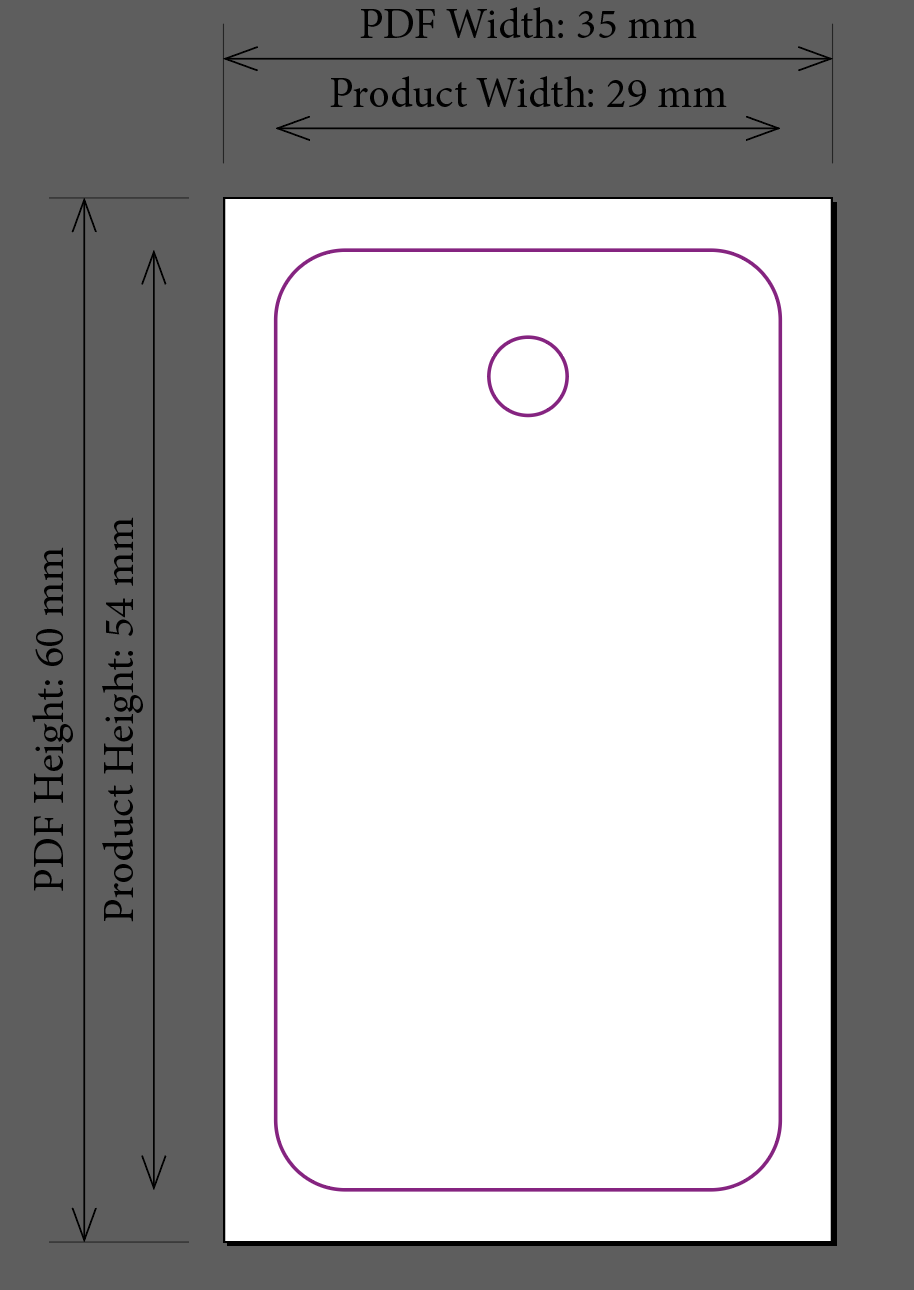
| Key fobs |
54 x 29mm
|
60 × 35 mm |
3mm |
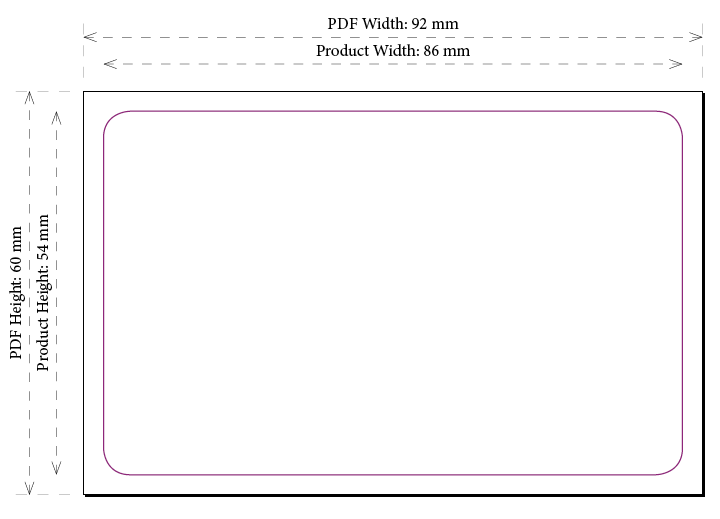
Bleed and Quiet Zone
Plastic Cards require 3 mm of bleed off all edges, and we recommend a
quiet zone of at least 7 mm from the page edge. You can bleed colours
and images to the page edge on these products, but remember to keep all
important text and objects at least 7 mm from the page edge.
The Plastic Cards have rounded corners, the radius of these can't be
changed from the standard 5 mm. The templates for the Plastic Cards
contain an indicator on the Trim Layer as to where the item will be die
cut down to.
There is a 2mm tolerance on trimming.
Colour & Ink levels
The Plastic Cards are digitally printed onto a special plastic core material. Maximum ink is 300%.
Ink levels must be set to a maximum of 300% total ink.
All files must be supplied in CMYK. RGB, Pantones and other colour
spaces are not supported and will be converted to CMYK, this could cause
a colour shift so we recommed that the conversion to CMYK is done prior
to upload.
The minimum tint level is 10% per CMYK channel and tints over 90% will tend to look 100% when printed.
Solid black is best supplied as 100% black (not rich black or 4-colour black).
Fonts
Your PDF file must have all fonts converted to outlines. We recommend keeping all text above 5pt size.
Images & Reproduction of details
If you are using bitmap based artwork then ensure your files have a
resolution of at least 300 dpi. TIF, JPEG and PNG images are supported
within your PDF. Images must be CMYK.
The minimum stroke thickness is 0.5 pt for positive strokes and 1 pt
for negative stokes (when a line is punched out of another coloured
object).
Finishing options
- Punched hole or slot
- Numbering
- Signature strips
- Magnetic strips
- Personalisation
Plastic Card Options per Product
All Plastic cards have an option to finish as matt or gloss.
✔️ - Included as standard
O - Optional extra
| Product code |
Product Name |
Print |
Min. Qty |
Hole or slot |
No. |
Sig strip |
Photo |
Name or Address |
| NCC1PLAS |
Plastic Business Card |
4x4 |
50 |
O |
|
|
|
|
| WMSWPLAS |
Plastic Membership Card |
4x4 |
50 |
O |
O |
O |
O |
O |
| WMSWPLA2 |
Photo ID card |
4x4 |
10 |
O |
O |
O |
✔️ |
✔️ |
| WMSWPLA5 |
Plastic Key Fob |
4x4 |
50 |
✔️ |
O |
O |
|
|
| PCBC70L |
Plastic Credit Cards |
4x0 |
50 |
|
|
|
|
|
| PCBC74L |
Plastic Credit Cards |
4x4 |
50 |
|
|
|
|
|
| PCBC4HL |
Plastic Credit Cards + Hole or Slot |
4x4 |
50 |
✔️ |
|
|
|
|
| PCBC0NM |
Plastic Credit Cards + Numbering |
4x0 |
50 |
|
✔️ |
|
|
|
| PCBC4NL |
Plastic Credit Cards + Numbering |
4x4 |
50 |
|
✔️ |
|
|
|
| PCBC0SM |
Plastic Credit Cards + Sig Strip |
4x0 |
50 |
|
|
✔️ |
|
|
| PCBC4SM |
Plastic Credit Cards + Sig Strip |
4x4 |
50 |
|
|
✔️ |
|
|
| PCBC0NSM |
Plastic Credit Cards + Numbering + Sig Strip |
4x0 |
50 |
|
✔️ |
✔️ |
|
|
| PCBC4NSM |
Plastic Credit Cards + Numbering + Sig Strip |
4x4 |
50 |
|
✔️ |
✔️ |
|
|
| PCBCF0L |
Plastic Transparent Credit Cards - Frosted |
4x0 |
50 |
|
|
|
|
|
Optional Extras
- Magnetic stripe
Magnetic stripe with Encoding - Signature panels
- Punched holes & slots
- Numbering
- Barcodes
- Personalisation
Excel data
Photos
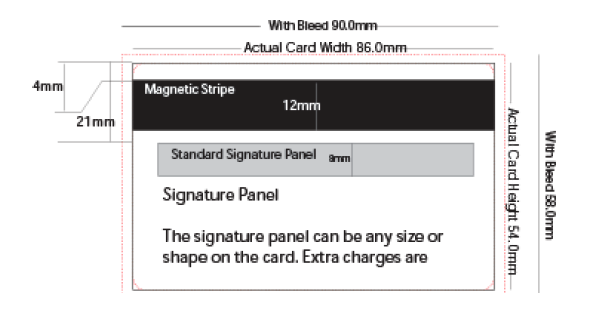
1. Magnetic stripe
Indicate the magnetic stripe position on an additional PDF page, separate from the printed artwork files.
- The magnetic stripe should be indicated in 100% black ink only.
- .
- Always positioned on the reverse of the card, either 4mm from the top or bottom edge.
- Avoid placing any
pertinent information (i.e. terms and conditions, phone numbers, website
addresses) within 3mm of the magnetic stripe.
- Avoid placing
text directly above the magstripe if you intend to position to magstripe
near the top of the card (and vice versa for positioning the magstripe
near the bottom of the card).
- Unless it is critical for background artwork/designs to run
underneath the mag stripe then please follow the recommendation above.
Failing to follow these guidelines means that your artwork runs the risk of text or numbering being cut off.
Magnetic stripe with Encoding
HiCo (High Coervicity) Encoding onto a magnetic stripe can be either
numbers, letters or both. To process an order for magnetic encoding,
confirmation is required of the data to be programmed and the track type needed. The requirements of the track type is usually determined by the system/reader the cards are going to be used in.
The magnetic stripe contains tracks - this is where the data is encoded onto the card.
- Track 1 is for alphanumeric data (letters and/or numbers)
- Track 2 is numeric only
Magnetic stripe with alphanumeric data
A ZIP file is required containing:
- A PDF with the location of the magnetic stripe (as per instructions above)
- An Excel data file is required for encoding data that is not
sequential or not numerical e.g. codes or names. Encoding data would
need to be provided in excel, in one column titled “ENCODING” (see Personalisation section below)
Magnetic stripe with numeric data
- A PDF with the location of the magnetic stripe (as per instructions above)
- A sequential number sequence, can be provided as a finishing note, rather than provided as an excel file. E.g. "001-500"
2. Signature panels
Indicate the signature strip position on an additional PDF page, separate from the printed artwork files.
- The Signature panel should be indicated in 50% magenta + 100% yellow only.
- Signature panels are normally
- Standard dimensions are usually
- The maximum possible dimensions are but this must not bleed off the edge of the page.
- Always positioned on the reverse of the card.
Vertical signature panel requests (on a landscape card), multiple
panels or panels larger than these dimensions must be submitted as a
bespoke quote request.
3. Punched holes & slots
Indicate punched hole(s) or slot(s) on an additional PDF page, separate from the printed artwork files.
- Location should be indicated as a solid circle/slot in 50% magenta + 100% yellow ink only.
- Punched holes or slots must be a minimum distance of 5mm from any edge of the card.
- The standard hole size is
- Holes can be positioned either in any corner of the card or centrally along the short/long edge of the card.
- The slot dimension is
- Slots can be position centre long edge or short edge.
4. Numbering
Indicate the location of numbering on an additional PDF page, separate from the printed artwork files.
- Specify any colour in CMYK
- Any size
- The font needs to be Arial
- Use the starting number in the style you want
- Sequential numbering can be alphanumeric (letters and/or numbers)
- Provide us with the number sequence after placing your order.
5. Barcodes
Barcodes allow you to add sequential numbering that is scanned rather just printed on the card. Ideal for membership numbers.
Indicate the location and size of the barcode on an additional PDF page, separate from the main artwork files.
- Provide us with the number sequence after placing your order.
Choosing which type of barcode
.png)
Code 128 barcodes have a very high data density and Code 39 barcodes
have a low data density, therefore very small goods should be labeled
with Code 128 barcodes where possible.
Most barcode scanners can read both Code 128 barcodes and Code 39
barcode images easily, but you should confirm this with your client
based on the scanner and system being used.
6. Personalisation
You can include any number of personalised fields on one side of the card.
Indicate any extra personalisation elements (names, numbering,
addresses & photos) by placing them on an additional PDF page,
separate from the printed artwork files. Using your first example of
information from your spreadsheet.
- A sample of the data / photo size / location should be indicated in 100% magenta ink only, using the exact font type and size required.
- A ZIP file is required containing:
Excel Data
The first row should contain the field headers and the columns below should contain your data, see the example below.
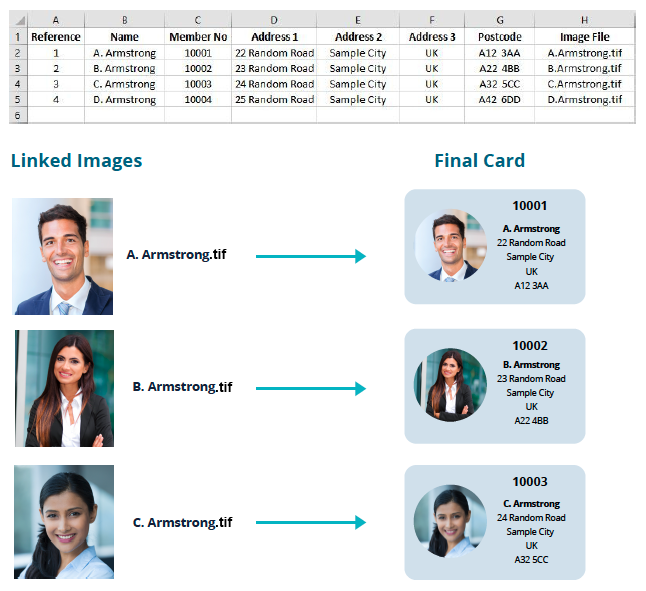
File supply for Photos
- The folder containing photos must be accurately referenced in the
data file, the exact name matching including the file extension e.g. A.
Armstrong.tif
- (JPEGs will also be accepted)
- Supplied at a minimum of 300 dpi
- CMYK format.

 Print this page